Adding IPv6 support to VestaCP 0.9.8-19
The current release of VestaCP (which I use to host this site) doesn’t currently support IPv6. In this tutorial I will explain how I managed to make my server accept IPv6 connections with very little changes to the config files of my server, in a way that makes it very easy to undo the changes when VestaCP eventually supports IPv6 officially.
First some details about my installation. I am currently running VestaCP version 0.9.8, release 19. It uses Apache for virtual domains and Nginx as reverse proxy (what actually serves each domain publicly), on a fresh install of CentOS 7.4.
Depending on your installation, this tutorial might not work, but it might at least point you towards the right direction.
Summary
In this tutorial I will explain:
- How to find your public IPv6 address.
- How to check if your DNS entries for IPv6 were setup correctly.
- How to customize VestaCP configuration files without risk of overwrites or corruptions.
- How to test the configuration files of Nginx and Apache for syntax errors without restarting their services.
- How to test if IPv6 traffic routes to your server properly.
Setting up the DNS
Before we even start, we need to make sure the DNS records are set up correctly. VestaCP can’t see the IPv6 assigned to your machine, so you need to find this out yourself.
One way to do this is by running ip -6 addr on your shell. In my case this was the output:
$ ip -6 addr
1: lo: <LOOPBACK,UP,LOWER_UP> mtu 65536 state UNKNOWN qlen 1
    inet6 ::2/128 scope global
       valid_lft forever preferred_lft forever
    inet6 ::1/128 scope host
       valid_lft forever preferred_lft forever
2: eth0: <BROADCAST,MULTICAST,UP,LOWER_UP> mtu 1500 state UP qlen 1000
    inet6 2a03:b0c0:2:d0::625:d001/64 scope global
       valid_lft forever preferred_lft forever
    inet6 fe80::7c8b:b3ff:fe39:c2e2/64 scope link
       valid_lft forever preferred_lft forever
3: eth1: <BROADCAST,MULTICAST,UP,LOWER_UP> mtu 1500 state UP qlen 1000
    inet6 fe80::c60:d5ff:fe07:db29/64 scope link
       valid_lft forever preferred_lft forever
In my case I know my public interface is the one labeled eth0, but I can rule out the first one, since it is a LOOPBACK interface, and also the third one, because it starts with fe80, which means it is a local interface address. Therefore my public IPv6 is 2a03:b0c0:2:d0::625:d001.
With that in mind, all I had to do was setup two DNS AAAA entries in my host provider (one for the domain itself, and one for the www subdomain). A DNS AAAA entry behaves exactly like a A entry, except it indicates an IPv6 address instead of an IPv4. The way you setup these entries depends on your hosting provider, so reach out to them if you can’t figure out how to do it.
I can test my DNS entries work by running dig bruno.ph AAAA on a shell in any machine connected to the internet:
$ dig bruno.ph AAAA | grep bruno.ph
; <<>> DiG 9.9.4-RedHat-9.9.4-51.el7_4.2 <<>> bruno.ph AAAA;
bruno.ph.           IN  AAAA
bruno.ph.   1800    IN  AAAA    2a03:b0c0:2:d0::625:d001
Setting up Nginx
One important detail of running a control panel software like VestaCP is that most of the configuration files for the server software are automatically generated, and any changes you make to them will be overwritten when you make any changes from the control panel, or worse, will cause these files to be corrupted, causing your server software to fail launching. We want to avoid this possibility, and thankfully VestaCP is a very versatile software that provides methods of customizing the configuration files without risk.
In our case, the Nginx configuration files have hooks for extra configuration files that you can place in the same directory in order to customize them. If you read the contents of the configuration file for a certain domain, you will see near the end of the file that it includes any files with a certain prefix. For example, in the case of my domain bruno.ph, the configuration file ~/conf/web/bruno.ph.nginx.conf includes the following line:
include /home/<USERNAME>/conf/web/nginx.bruno.ph.conf*;
This means any file that matches that prefix will be included in the scope of that server configuration. So I created the file /home/<USERNAME>/conf/web/nginx.bruno.ph.conf.ipv6 with the following contents:
listen [2a03:b0c0:2:d0::625:d001]:80;
Next I repeated the process by looking for the include prefix in the SSL version of the configuration file, creating the file /home/<USERNAME>/conf/web/snginx.bruno.ph.conf.ipv6 (notice the s prefix in the filename) with the following contents:
listen [2a03:b0c0:2:d0::625:d001]:443;
Next, I tested the configuration files by running the Nginx tester tool nginx -t:
$ nginx -t
nginx: the configuration file /etc/nginx/nginx.conf syntax is ok
nginx: configuration file /etc/nginx/nginx.conf test is successful
This is an important step, as a syntax error in these files will cause the nginx restart to fail, and your server to go down! Thus make sure to run this tool every time you make changes to config files.
As a sidenote, Apache also has a config tester tool. Just run
apachectl configtest.
Knowing the config file is good, we simply need to run service nginx restart to restart the server with the new settings.
Testing IPv6 routing
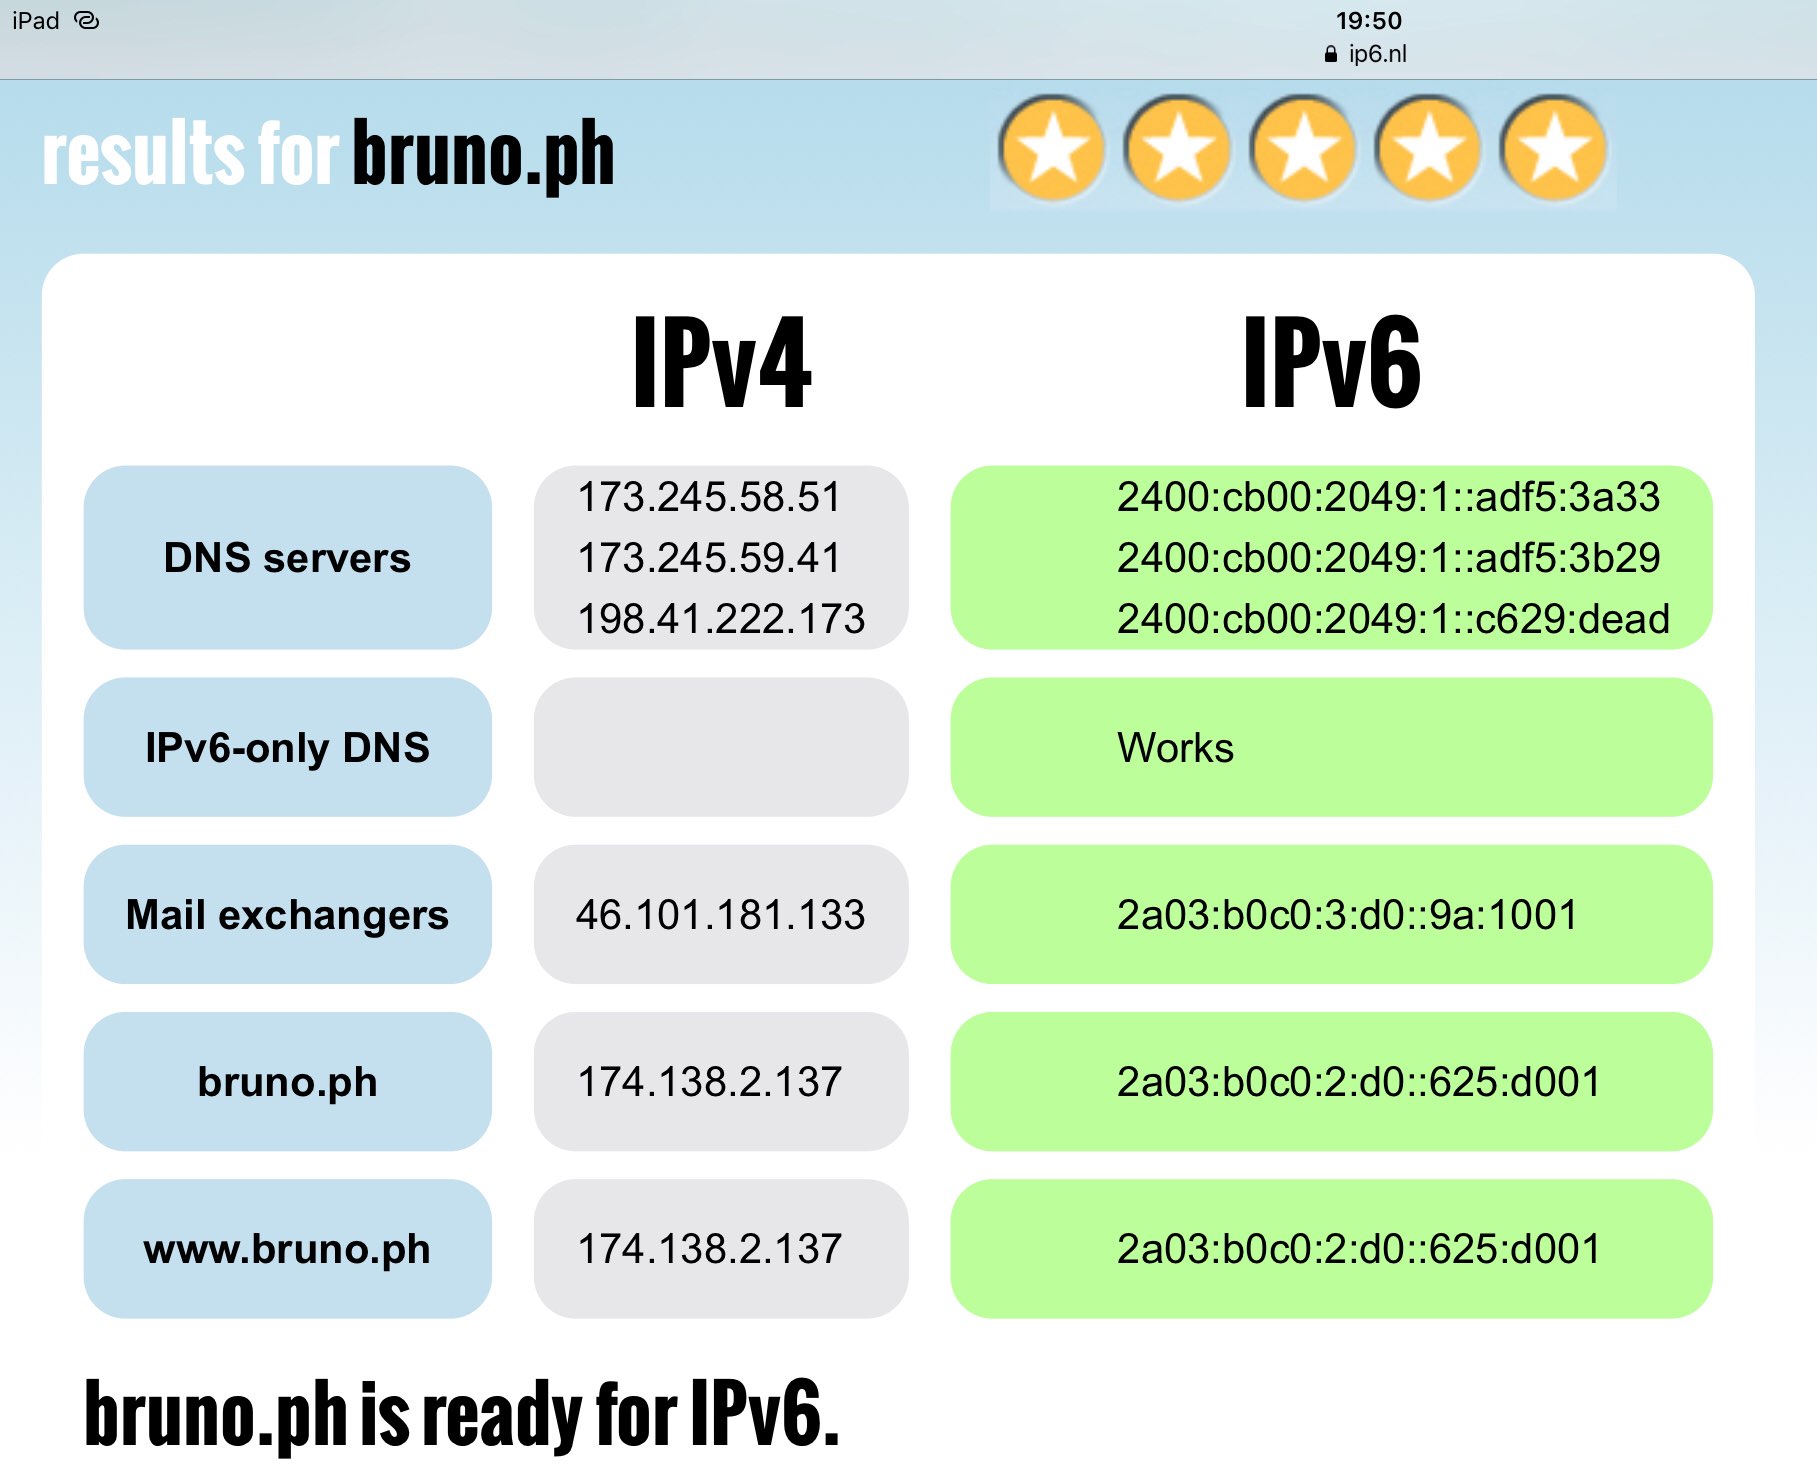
If you are unsure whether your have IPv6 enabled in your own device, you can visit ip6.nl to find out. That page will show the IPv6 routing capabilities of your own connection. In my case, my ISP does not yet provide IPv6 connectivity at all, therefore I can’t test if IPv6 works myself. However that website also provides domain readiness tests, so all you have to do is fill your own domain the filed under the label "test the IPv6 readiness of an internet domain" and it will test the IPv6 capabilities of your server. In my case, everything works fine!
That concludes this tutorial. Hopefully this helps you setup your own VestaCP installation to accept IPv6 traffic!